 NHS Borders clinical guidelines
The Delta MBJ20 Transcutaneous Jaundice Detector (Delta Meter) is used for the dynamic clinical examination of neonate jaundice, by transcutaneous measurement of the concentration of bilirubin. It is used for initial screening and ongoing monitoring of bilirubin values in jaundice treatment.
POCT Delta MBJ20 Transcutaneous Jaundice Detector

Warning
Paediatric Advanced Nurse Practitioner (PNP):
- Responsibility for training staff will lie with the PNPs and any nominated Cascade Trainers to ensure training is consistent and covers all appropriate aspects required.
- Maintenance of records of trained users
- 3 Monthly comparison of Delta readings against laboratory plasma bilirubin method
Trained Users:
- Responsibility for use and general upkeep of the Delta meter will lie with the community midwives and Special Care Baby Unit (SCBU) within NHS Borders.
- Maintaining accurate records using supplied paperwork contained within this document
- Maintaining own competency through correct use of the meter and engagement with any training and competency assessments laid out by the PNP.
- Reporting of any faults to the POCT Team.
Point of Care Testing (POCT) Team:
- Performing annual maintenance and calibration as outlined in this document.
- Sign off post-calibration testing to allow meter to be put back into use for patient testing
- Supplying PNP with laboratory bilirubin data for monthly comparison
- Support with creation/review of any documentation required
- Assist with promotion of general good POCT practice.
- Raising faults that require input from Delta
- Liason between the laboratory and PNP in case of any changes to bilirubin method that may result in further evaluation exercises
The principle of operation of the Delta meter is dual wavelength light absorption. Light at two different wavelengths is shone onto the skin of the patient at a location where blood-flow is close to the surface, typically the sternum or forehead. Silicon photodiode detectors in the device then measure the reflected light. The light wavelengths are chosen so that one is absorbed by bilirubin, and the other is not, but both will be absorbed to the same degree by the skin, tissue and other physiological structures. By subtracting the measured reflected light at the two wavelengths the common absorption can be eliminated, thus leaving only the amount absorbed by the bilirubin present.
Please refer to section 3.3 Specifications of the MBJ20 Transcutaneous Jaundice Detector Instruction Manual V4.09 for device specifications.
Validation/Verification data is available electronically at
I:\Labs\Shared Documents\POCT\Bilirubinometer\Delta Jaundice Meter\Evaluation
Uncertainty of measurement data is available electronically at
I:\Labs\Shared Documents\POCT\Bilirubinometer\Delta Jaundice Meter\Evaluation\ Delta Jaundice Meter Inter and Intra Assay Precision
Perform transcutaneous bilirubin estimation in all visibly jaundiced neonates in the first 14 days of life, except in the following circumstances where serum/plasma bilirubin should be measured:
- Less than 24 hours of age
- Less than 35 weeks gestation
- Previous phototherapy use
Caution should also be used where there is known or suspected haemolysis (e.g. where there are maternal blood group antibodies of concern, a history of siblings with severe early haemolysis or the baby is DAT positive in keeping with haemolysis). In this group it may be prudent to use serum/plasma bilirubin measurements, at least initially. Any baby falling into this group (known or suspected haemolysis) should have their initial management in a hospital setting and a clear plan for follow up sampling etc made by the discharging paediatrician.
Babies over 14 days of age who are visibly jaundiced should follow guidance for prolonged jaundice.
In patients where transcutaneous bilirubin estimation is deemed appropriate, please check the following:
- skin of patient is clean in measurement area.
- ensure probe is perpendicular to skin surface.
- avoid movement during measurement.
Transcutaneous neonatal skin, either forehead or sternum where there is sufficient subcutaneous blood circulation.
Delta MBJ20 Transcutaneous Jaundice Detector
Calibration Unit
Alcohol wipes
Lint-free cloth
1. Routine Maintenance
A visual inspection of the meter should be carried out prior to use and any damage reported to the POCT Team and returned for checking.
Batteries should be removed from meter if in storage to avoid degradation of batteries. This can be done by opening the battery compartment at the back of the meter.
2. Cleaning
Outer Casing
Clean the outer casing of the meter with a damp, lint-free cloth before and after each use avoiding substances that contain paraffin/solvents. The meter should not be submerged in liquid. Power switch, connector and case seams should not be exposed to liquid.
LCD Display
To clean the LCD display, use a soft lint-free cloth lightly dampened with water. Do not spray directly onto display and do not use alcohol or medical disinfectants.
3. Annual Maintenance
Once a year each meter must have a preventative maintenance check and calibration carried out by the POCT Team. This should be scheduled to ensure continuity of service for users so there is always a meter available. The annual maintenance should include:
- Overall check of meter – any signs of damage, solid/fluid ingress of meter, meter not operating normally or if meter dropped Delta engineer should be contacted
- Battery check
- Thorough clean of meter
- Calibration
The annual maintenance will be recorded by the POCT Team and recorded on the Annual Maintenance and Calibration Log (Appendix 4)
4. Post-Annual Maintenance
Before the meter is put back into use for patient testing, the meter should be sent to Special Care Baby Unit (SCBU) and a comparison should be made against 5 plasma bilirubin samples to ensure (within ±25µmol/L). The results of these tests should be recorded on the Transcutaneous – Plasma Bilirubin Comparison Sheet (Appendix 3) and sent to the POCT Team for sign off before meter is returned to routine use. Any results out with the acceptable range will be discussed with the Duty Biochemist before a decision is made to return the meter to routine use or if any further actions are required.
5. Troubleshooting
If an error occurs during routine operation, refer to the below table for first course of action.
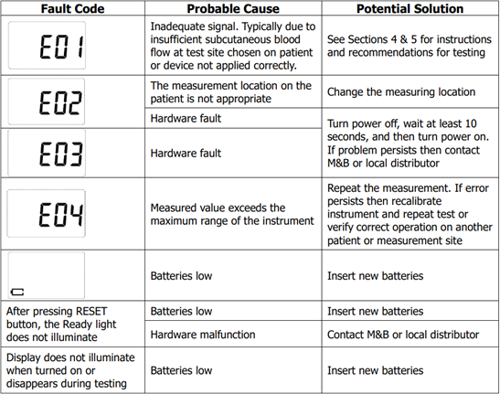
If this does not resolve the issue, POCT Team should be contacted for further input
| Contact | Telephone | |
| POCT Team | bor.pointofcareservice@borders.scot.nhs.uk | 01896 826253 |
| POCT Manager | diane.brotherston@nhs.scot | |
| POCT Assistant | scott.wilson@nhs.scot |
When not in use, the meter should be kept in the supplied storage case, in a cool dry place away from direct sunlight.
Storage Temperature
-20°C - +55°C
Operating Temperature
+10°C - +40°C
- The meter can only be used indoors.
- Avoid the use of mobile phones or other high interference equipment near the meter due to electromagnetic interference.
- The meter should not be stored or transported in an area where vibrations or physical shock are likely to be felt.
Meter calibration should only be carried out by authorised personnel in the POCT Team. The instances when this should be performed are as follows:
- As part of the annual maintenance check
- If routine daily check results are out with acceptable range
- If the accuracy of results is in question
- If meter has been dropped or damaged
1. Performing Annual Calibration
The Annual Maintenance and Calibration Record Sheet (Appendix 4) must be filled out while performing calibration test.
Before performing calibration test, the calibration coefficient should be checked on meter. To enter calibration mode, with the power OFF press and hold RESET button and switch power ON. Note this value in the Starting Calibration Coefficient column of the calibration section of the sheet and switch power OFF.
To perform the test, using yellow side of the calibration unit, perform a daily check using process outlined in section 13.2. Note this measurement in the Calibration Test Result column.
Using the formula Y = 342 – B, where B is the measurement taken using the yellow disk, calculate the Y value and note in the Y column.
The calibration coefficient will then be adjusted based on the Y value.
2. Adjusting Calibration Coefficient
Enter calibration mode, with the power OFF press and hold RESET button and switch power ON.
Press the SET button to increase or RESET button to decrease calibration coefficient (Y). This can be adjusted by up to -169 and +169µmol/L in steps of 1.7µmol/L. Note this value in the Calibration Coefficient Adjustment column.
Once set, save the value by pressing the measuring probe down and hold for two seconds.
The READY light should illuminate, and the lock symbol will display on screen.
Any adjustments made will be checked and signed off by both members of the POCT Team and must also be recorded in the POCT Calibration Log Spreadsheet (available at Shared Documents > POCT > Bilirubinometer > Calibration).
Once any adjustments to calibration coefficient have been made, daily checks on both the white and yellow areas of the calibration unit should be performed and noted in the respective columns on the Annual Maintenance and Calibration Record Sheet. If results are within acceptable ranges (±25µmol/L), the annual verification of the meter will be performed.
20 replicates of each side of the calibration disk will be performed in one day followed by 5 replicates of each side of the calibration disk over 5 consecutive days.
After completion and acceptance of the results the meter can be returned to SCBU for Post-Annual Maintenance checks detailed in section 9.4.
n/a
1. Meter Overview

Before use, the battery should be checked. This is performed by pressing the RESET button while the meter is ON. If the Ready light does not turn green within 12 seconds, the batteries will need to be replaced. The meter uses 2 x AA alkaline batteries (1.5V).

Note, units will be measured in µmol/L. Screenshots included in this document are displayed as mg/dL.
2. Daily Check
The meter will be checked daily using the calibration unit. The calibration unit is included with the meter and contains two measuring areas: a white area (measuring 0µmol/L); and a yellow area (measuring 340µmol/L). Each calibrator unit is matched to the device it is supplied with and must be kept together. The serial number of the device is inscribed on the calibration unit.
To perform the daily checks, the meter should be held with the measuring probe facing directly upwards. Place the calibration unit on the probe and gently press the disk directly downwards, applying even pressure on both sides. This helps to ensure the measuring probe is perpendicular to the internal surface of the disk to give most accurate readings. Results from the daily checks should be recorded on Daily Check Recording Sheet (Appendix 1). Completed daily checks sheet should be scanned and emailed to the POCT Team at the following address: bor.pointofcareservice@borders.scot.nhs.uk


| Calibration Unit | Acceptable Range |
| Yellow (340 µmol/L) | 315 – 365 µmol/L |
| White (0 µmol/L) | -25 – +25 µmol/L |
If either measurement falls out with the acceptable range, the test should be repeated ensuring the unit is correctly positioned and even pressure applied when taking the measurement.
If result continues to fall out with acceptable range the meter should be withdrawn from use immediately and not used for patient testing. It should then be sent to the POCT Team for recalibration.
3. How to Take a Patient Measurement
Before performing measurement on patient, ensure skin is clean at measurement site. Three measurements should be taken with an average calculated.
Remove the meter from the protective carry case, remove the probe cover and wipe the measuring probe with alcohol wipe. Allow alcohol to evaporate before taking measurement.
Turn power switch ON. The system version number will appear onscreen, then display measurement 00.0.

Press the RESET button to start charging. The meter will be ready for use when the READY indicator lights up green and the display appears as below.

Ensure the measuring probe is perpendicular and entire face of probe is against the skin, avoiding any gaps, when it touches the measurement site on the patient.

Press directly down gently on the measurement site (sternum or forehead) until the probe flashes, indicating a measurement has been taken.

The measured value will appear on the LCD display. 001 will appear alongside the measurement indicating this is the first measurement.

If further measurements are required, press the RESET button and repeat measurement. 002 will appear on the LCD display indicating a second measurement has been taken.

Once testing is completed, turn power switch OFF, clean probe with alcohol wipe, replace probe cover and return to protective carry case.
Results must be recorded on Patient Results Sheet (Appendix 2) and in patient notes. Once Patient Results Sheet is full, it should be scanned and stored electronically, with a copy sent to POCT Team, and a fresh sheet started.
4. Average Test Mode
The manufacturer advises against use of the Average Test Mode as it does not allow review of each independent measurement. Three standard measurements should be taken and recorded on Patient Results Sheet (Appendix 2), and an average calculated as detailed in Section 13.3.
5. Use During/After Phototherapy
During Phototherapy
NICE Guidelines advise against the use of transcutaneous bilirubin measurement for babies undergoing phototherapy.
After Phototherapy
Skin treated by phototherapy should not be tested until after 48 hours of exposure to ensure accurate transcutaneous measurement.
6. Error Messages
During operation there may be error messages appear on the LCD display. Refer to Section 9.5 Troubleshooting for further details.
7. Results
Transcutaneous bilirubin levels of over 250µmol/L or within 50µmol/L of the treatment threshold (see Appendix 5: Treatment Threshold Graphs), must have an SBR (serum/plasma bilirubin) checked to inform management.
A repeat measurement is recommended for those with a level within 50µmol/L of the treatment threshold as follows:
- Within 24 hours for those at standard risk
- Within 18 hours for those at increased risk:
- Exclusively breast fed
- A sibling who required phototherapy
- Less than 38 weeks gestation
- This may be a challenge in the community setting and a pragmatic approach must be taken, e.g. ensure seen as early as possible the following day if the 18-hour recommendation cannot be achieved. Consideration should be given to taking a serum/plasma sample in this situation as well to aid decision making.
For all levels, comparison with previous measurements where available is much more informative than looking at a single measurement. This should be borne in mind when using any of these thresholds. Where the rate of rise can be determined it should be used to plan future samples/referral to hospital rather than the action points below. This is particularly relevant on the flatter “plateau” phase of the charts (from 72 or 96 hours of age). If in doubt, please contact the neonatal medical staff/ANNPs for advice.
8. Reviewing Previous Measurements
To access previous measurements, press and hold the SET button while turning the meter ON. The latest result will appear on the LCD display and number of stored results indicated on the left. To cycle through these results, the SET and RESET buttons can be used to move backwards and forwards respectively.

The maximum number of measurements the meter can store is 21. If there are no stored results, then a “No Data” message will be displayed.
9. Deleting Stored Measurements
To delete stored measurements, the SET and RESET buttons should be held down together while turning the power switch ON. The meter will display a “No Data” message. To use the meter again, it must be switched off and back on again.

Note this will permanently delete all stored data so care must be taken to ensure all measurements have been recorded in patient records before using this function.
Daily checks will be performed on each Delta meter using the calibration unit included with the meter. See section 13.2 for instructions.
No known EQA schemes are available for transcutaneous bilirubin measurement.
Transcutaneous bilirubin results will be compared with the laboratory bilirubin results and reviewed quarterly.
A Pathmanager query will be generated listing the laboratory bilirubin results. These will be compared with the transcutaneous measurements and recorded on the Quarterly Comparison of Bilirubin excel sheet and reviewed by the POCT Team and the duty Biochemist.
Electromagnetic interference – avoid the use of mobile phones or other high interference equipment near the meter.
Results are calculated by measurement of two different wavelengths of light that are absorbed to the same degree by skin, tissue and other physiological structures. One of these wavelengths is absorbed by bilirubin and the other is not. The bilirubin is calculated based on the difference between these two wavelengths.
For all visibly jaundiced babies (greater than 24 hours, greater than 35 weeks and without previous phototherapy):
- Take a measurement with the transcutaneous bilirubinometer
- Plot the result on the gestation specific charts below
- If this is the first measurement act according to the guidance given based on the line immediately below the plotted point:
If previous measurements are available, decisions around the need for SBR sampling/referral to hospital will depend on whether the level is rising or falling, and the age of the child.
- All levels above the phototherapy level should be referred to hospital for immediate attendance
- All rising levels should be considered for a repeat in 24 hours as a minimum, or SBR check/referral depending on their place on the chart
- Stable/falling levels can be assessed and the need for SBR/repeat etc will depend on the age of the child and gestation. In other words, if the transcutaneous level is clearly falling but remains within the “take SBR” zone, an SBR need not necessarily be performed, if previous SBRs have been adequately far from the treatment line.
Refer to Appendix 5: Treatment Threshold Graphs for further information.
0 – 540µmol/L
If unable to obtain transcutaneous bilirubin concentration measurement, a plasma sample should be taken and sent to laboratory for analysis.
>250µmol/L or within 50µmol/L of treatment threshold. Refer to Section 18 and Appendix 5 for details.
n/a
- If measuring probe not perpendicular to measuring site, measurement may not be accurate
- Measurement may be affected if measuring probe not maintained properly and cleaned in between uses
- Skin tone can affect transcutaneous bilirubin measurement
- Bilirubin concentration in subcutaneous tissue may rise slower than serum/plasma bilirubin in cases of precocious jaundice
- If measurement taken from area with low blood volume or subject to keratinisation, subcutaneous bilirubin concentration may be lower
- If patient subject to phototherapy, subcutaneous bilirubin concentration decreases faster than serum/plasma bilirubin concentration
- When used in conjunction with phototherapy equipment, transcutaneous measurements of bilirubin concentration may lead to misdiagnosis
Appendix 1: Daily Check Recording Sheet
Appendix 2: Patient Results Sheet
Appendix 3: Transcutaneous - Plasma Bilirubin Comparison
Transcutaenous - Plasma Bilirubin Comparison
Appendix 4: Annual Maintenance and Calibration Log
Annual Maintenance and Calibration Log
Appendix 5: Treatment Threshold Graphs