Central venous catheter insertion & removal (Guidelines)

Warning

Audience

  • All NHS Highland
  • Secondary Care only
  • Adults only

Insertion of CVC

Allergy

  • Confirm no allergy to skin preparation or products in line

Bleeding

  • Check platelet count and coagulation status: consider benefits of optimising
  • Consider stopping anticoagulant and/or antiplatelet therapy – balance of risks will depend on the urgency of CVC and risks of stopping therapy

Task fixation

  • Ensure adequate monitoring: ECG, SpO2, BP as minimum
  • Ensure there is a colleague assisting at the bed space during line insertion
    • Patient observation/Monitoring/Procedural tasks including “WIRE OUT” response

Sterility and PPE

  • Hat, mask, eye protection, sterile gloves and gown
  • Large fenestrated drape + / - additional sterile drapes
  • Ideally a fresh, unused site
  • 2% chlorhexidine in 70% Isopropyl alcohol prepping from insertion point outwards; allowed to dry
  • Clean blood from site post insertion and apply transparent occlusive dressing

Air embolism

  • Patient positioning
    • Head down tilt for subclavian or internal jugular lines
    • Supine for femoral lines
  • All ports should be flushed before insertion
  • All but the distal port should be clamped or closed with a sterile bung
  • Use self-sealing bungs on all ports from time of insertion
  • Avoid using 3-way taps where possible. If used, ensure self-sealing bungs are fitted to each access point
  • Use “octopus” connectors when connecting 2 or more compatible infusions to a single lumen

Toxic injection (local anaesthesia; cleaning fluid)

  • Consider a closed system for saline flushes: 100ml bag 0.9% saline with a blunt fill needle inserted.
  • Use a sealed chlorhexidine stick

Needle stick

  • Use blunt needles for saline and local anaesthetic syringe loading
  • Consider using a stitch set rather than handheld needle for suturing
  • Reduce distraction to allow focus when handling sharps
  • Safe, timely disposal of sharps into nearby sharps bin

Suturing

  • Use a line of appropriate length
  • If forced to use a longer than ideal line, ensure that the line itself is sutured to the skin not just the clips i.e. will need 4 sutures for correct fixation
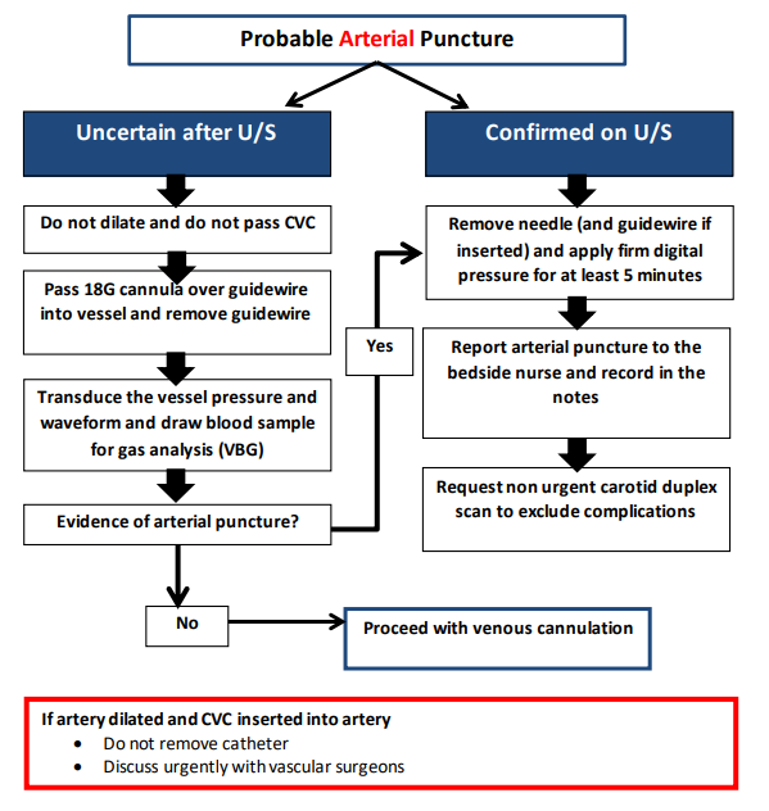
Arterial puncture

  • Use real time ultrasound guidance to ensure correct vessel puncture
  • Confirm guidewire position in vein with US before dilation
  • Transduce proximal port and take VBG to confirm venous placement before use
  • If concern re arterial puncture follow plan:

Retained guidewire

  • Retain view of + / - hands-on guidewire during the procedure
  • Guidewire should be removed before attempting aspiration or flushing of any ports on an inserted line.
  • Do not allow distraction when exchanging the catheter over the guidewire
  • Confirm guidewire removal with “WIRE OUT” declaration by operator and “WIRE OUT” acknowledgement from assistant

Post procedure CXR

  • Confirm date, time and patient ID
  • Review for pneumothorax, haemothorax, enlarged cardiac outline, line position
  • Tip of CVC should be within the superior vena cava, just superior to the right atrium radiologically at the origin of the right main bronchus
  • When inserting from the left side, the tip should not be abutting the side wall of the SVC
  • Document the line depth at the skin at the time of the CXR.

Removal of CVC

Any qualified nurse who has been assessed as competent and who follows there guidelines can remove non-tunnelled CVCs

You may need assistance during this procedure: always liaise with an adjoining bed space, a nurse nearby or the nurse in charge before starting

  • Check the patient’s coagulation status. If there is an increased risk of bleeding discuss with the medical team before proceeding. If the platelets are <50, platelets should be administered immediately before the procedure. If the patient is anticoagulated, this should be managed as for surgery
  • The risk of air embolism increases if the patient is dehydrated, is unable to lie flat, or has an uncontrolled cough. Only proceed if it is safe to do so.
  • Use aseptic technique.
  • Lie the patient flat with a head down tilt (except with femoral lines)
  • Remove the dressing. If there is any sign of infection, take a swab of the exit site. Remove any stitches. Cleanse the area with a chlorhexidine swab.
  • Ask the patient to perform a Valsalva manoeuvre, if the patient is unable to do this, remove the catheter during expiration.
  • Gently and swiftly remove the catheter and immediately apply pressure to the site using
    sterile gauze. The patient can now breathe normally and the bed returned to the flat
    position.
  • Apply pressure for 3 minutes, longer if coagulation issues.
  • If systemic infection is suspected, use sterile scissors to cut the tip off the catheter and drop it into a sterile pot to send to microbiology for culture.
  • Apply a sterile occlusive dressing to prevent air entering the vein.
  • Advise the patient to lie flat for 30 minutes
  • During this time observe the patient for signs of haematoma e.g. swelling, voice change, airway obstruction
  • Keep the wound dry for 5 to 7 days and monitor until healed.

Line Changes

  • CVCs do not need changed at set intervals, although suspicion of catheter related blood stream infection (CRBSI) should increase each day the line remains in situ.
  • If CRBSI is highly suspected, consider taking paired blood cultures peripherally and from the CVC.

Central Venous Catheter Checklist

Aim: To enhance the safety of CVC insertion in critical care

Scope: Competent practitioners, adults critical care patients

Equipment list

  • 5 lumen central venous catheter / dual lumen vascath correct length*
  • CVC procedure pack
  • Additional stitch; chloroprep stick
  • Hat & sterile gloves
  • Local anaesthetic
  • Normal saline 100ml bag
  • 5 x sterile bungs (CVL only)
  • ABG syringe
  • Ultrasound machine
  • Transducer set

Pause

  • Patient ID checked
  • Consent / AWI in place
  • Sedation optimised
  • Appropriate monitoring
  • Bleeding risk assessed
  • Appropriate operator *
  • Allergies?
  • Nurse in charge aware

Sign in

  • Patient position optimised
  • Lumens flushed with saline
  • Patient prep'd and draped
  • Bedside nurse ready to assist

Procedure

  • U/S guided venous puncture
  • U/S confirmation of guidewire in vein
  • Guidewire removed 'WIRE OUT' (assistant acknowledge with reply 'WIRE OUT')
  • Confirmation of catheter placement
    • Transduce and blood gas
  • Confirm lumens patent
    • Aspirate / flush / bung
  • Suture securely
  • Sterile dressing

Time out

  • Safe disposal of sharps - consider threading wire into plastic coil
  • Request CXR if appropriate
  • Transduce CVC via proximal lumen
  • Complete CVC checklist, file in notes
  • Concerns / complications recorded

* 16cm RIJ CVC; 20cm LIJ or femoral CBC; 25cm femoral vascath

** Operators new to Critical Care in Raigmore should have both CVC and vascath placement supervised and 'signed off' by senior clinician before independent practice.

Invasive Procedure Safety Checklist: CVC Insertion

Click here for the checklist (NHS Highland intranet required)

Abbreviations

  • BP: blood pressure
  • CRBSI: catheter related blood stream infection
  • CVC: Central venous catheters
  • CXR: chest x-ray
  • ECG: echocardiogram
  • ID: identification
  • LA: local anaesthetic
  • U/S: ultrasound
  • VBG: venous blood gas

Editorial Information

Last reviewed: 11/12/2025

Next review date: 11/12/2028

Author(s): Critical Care.

Version: 1

Approved By: TAM Subgroup of the ADTC

Reviewer name(s): M MacKinnon, Consultant Intensivist.

Document Id: TAM742